Handmade Christmas Ornament


Easy Origami
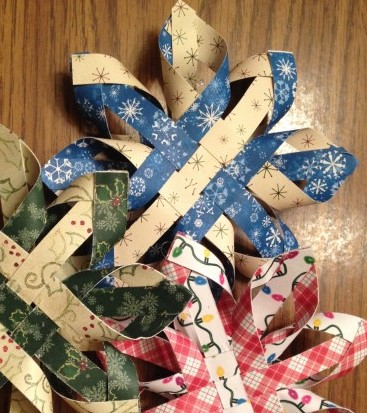
Just a few Summers ago, my granddaughter found an easy origami book at the library. One week later, we'd made several new folded paper creations. Our favorite was what the book called "The Color Wheel." We started with a six inch square, and even created one that was a four inch square. In fact that photo above is our first attempt at this craft project.
After we finished our debut piece, we decided that if we cut them down to two inches, they would make a wonderful ornament. So, below you'll find the steps we took to create our Origami Wheel Ornaments.
Supply List
The first thing you'll want to do is select your paper. You can use just about anything, plain paper, wrapping paper, origami paper, scrapbooking paper or more. You don't want to use cardstock because it will make it difficult to fold.
You can use up to 8 different patterns or colors. I personally think that the most attractive ornaments were made of two or four different patterns. All together you'll need sixteen (16) 2x2 squares. It is very important that they are close to perfect squares.
So, here's what you'll need:
- Sixteen 2"x 2" squares
- Elmer's Glue
- Hot (or Low-Temp) Glue Gun
- Silver or Gold thin cord
- Small beads (2 to 4 mm)

A Very Easy Origami
Below you'll see photos with instructions. You'll need 8 or 16 folded pieces, so by the time you get the first one done, you'll be a pro! I think just about anyone over the age of eight can make these ornaments. A younger crafty child might even be able to handle it. Just remember to always have fun!
Step by Step Photos


More Handmade Ornaments
- Handmade German Star Ornaments
German Stars (AKA Moravian Stars) are beautiful ornaments. They also make great gifts or creative craft projects for folks about 9 and up.
The Tricky Part


Now to Finish
With 8 folded pieces, you can make a one sided package decoration. You'll need 16 pieces to make a full two sided ornament. Here are the final steps.
Creating the sides of the ornament

")


The Finishing Touches
By now you should have two wheels that somewhat resemble the one above. At this point, I recommend you use a hot glue gun (low-temp will work) to glue a string loop at the top and then the two pieces together (I prefer to have the matching pieces touching back to back. Finally, take a small bead that matches your ornament and glue in the center of each side.
The Finished Ornament
This finished ornament is obviously not the one I was working on when I created the steps above. Unfortunately, I gave away all of the fifty that my granddaughter and I made before I remembered to take a photo of one. Someone in church was able to take a picture of the one I gave them, so here's a finished Origami Wheel Ornament

One More Ornament Pattern
- Handmade Snowflake Ornament
Making ornaments at Christmas is a great family tradition. This paper or fabric snowflake is easy and fun, but elegant.
© 2014 Lynne Modranski


